Elasticsearch settings
Here is a list of Elasticsearch settings (under elasticsearch. prefix):
Name |
Environment Variable |
Default value |
Documentation |
|---|---|---|---|
|
|
job name + |
|
|
|
job name + |
|
|
|
|
|
|
|
|
|
|
|
|
|
|
|
|
|
|
|
|
|
|
|
|
|
|
|
|
|
|
|
|
|
|
|
|
|
|
|
|
|
|
|
|
|
|
|
|
|
|
|
|
|
|
|
|
|
|
|
|
Index settings
Index settings for documents
By default, FSCrawler will index your data in an index which name is
the same as the crawler name (name property) plus _docs suffix, like
test_docs. You can change it by setting index field:
name: "test"
elasticsearch:
  index: "docs"
Index settings for folders
FSCrawler will also index folders in an index which name is the same as
the crawler name (name property) plus _folder suffix, like
test_folder. You can change it by setting index_folder field:
name: "test"
elasticsearch:
  index_folder: "folders"
Mappings
Added in version 3.0.
FSCrawler defines the following Component Templates
to define the index settings and mappings (replace INDEX with the index name):
fscrawler_INDEX_alias: defines the alias which name is the same as the crawler name (nameproperty) so you can search using this alias.fscrawler_INDEX_settings_total_fields: defines the maximum number of fields for the index.fscrawler_INDEX_mapping_attributes: defines the mapping for theattributesfield.fscrawler_INDEX_mapping_file: defines the mapping for thefilefield.fscrawler_INDEX_mapping_path: defines an analyzer namedfscrawler_pathwhich uses a path hierarchy tokenizer and the mapping for thepathfield.fscrawler_INDEX_mapping_attachment: defines the mapping for theattachmentfield.fscrawler_INDEX_mapping_content_semantic: defines the mapping for thecontentfield when using semantic search.
It also creates a semantic_text field named content_semantic. Please read the Semantic search section.
fscrawler_INDEX_mapping_content: defines the mapping for thecontentfield when semantic search is not available.fscrawler_INDEX_mapping_meta: defines the mapping for themetafield.
You can see the content of those templates by running:
GET _component_template/fscrawler*
Then, FSCrawler applies those templates to the indices being created.
By default, FSCrawler will check if the index template already exists before creating templates. If the index template exists, FSCrawler will skip the templates management, preserving any custom component templates you may have defined in advance.
This means you can create your own component template before starting FSCrawler. FSCrawler will then create all the missing component templates if any (but not the ones you already defined) and create the index template.
You can stop FSCrawler creating/updating the index templates for you
by setting push_templates to false:
name: "test"
elasticsearch:
  push_templates: false
If you want to force FSCrawler to push all templates (overwriting any existing ones),
you can set force_push_templates to true:
name: "test"
elasticsearch:
  force_push_templates: true
If you want to know what are the component templates and index templates that will be created, you can get them from the source.
Creating your own mapping (analyzers)
If you want to define your own index settings and mapping to set analyzers for example, you can create the needed component template before starting FSCrawler.
FSCrawler will detect that the component template already exists and will not override it. It will only create the missing component templates and the index template.
For example, you can define in advance your own component template fscrawler_fscrawler_mapping_content:
PUT _component_template/fscrawler_fscrawler_mapping_content
{
 "template": {
   "mappings": {
     "properties": {
       "content": {
         "type": "text",
         "analyzer": "french"
       }
     }
   }
 }
}
Then start FSCrawler. It will create all the component templates but fscrawler_fscrawler_mapping_content
(which you already defined) and create the index template.
Note
If someone wants to force pushing all the templates again (for example after an upgrade),
they can use force_push_templates: true. In the above example, the custom
fscrawler_fscrawler_mapping_content component template would be overridden.
The following example uses a french analyzer to index the
content field and still allow using semantic search.
PUT _component_template/fscrawler_fscrawler_mapping_content_semantic
{
 "template": {
   "mappings": {
     "properties": {
       "content": {
         "type": "text",
         "analyzer": "french",
         "copy_to": "content_semantic"
       },
       "content_semantic": {
         "type": "semantic_text"
       }
     }
   }
 }
}
The following example uses a french analyzer to index the
content field.
PUT _component_template/fscrawler_fscrawler_mapping_content
{
 "template": {
   "mappings": {
     "properties": {
       "content": {
         "type": "text",
         "analyzer": "french"
       }
     }
   }
 }
}
Tip
You can launch FSCrawler with --loop 0 to see what component templates and index templates
would be created without indexing any document. Then you can create your own custom component
templates and restart FSCrawler. Your custom templates will be preserved.
Replace existing mapping
Unfortunately you can not change the mapping on existing data. Therefore, you’ll need first to remove existing index, which means remove all existing data, and then restart FSCrawler with the new mapping.
You might to try Elasticsearch Reindex API though.
Semantic search
Added in version 3.0.
FSCrawler can use semantic search to improve the search results.
Note
Semantic search is available starting from Elasticsearch 8.17.0 and requires a trial or enterprise license.
Semantic search is enabled by default when an Elasticsearch 8.17.0 or above and a trial or enterprise license are
detected. But you can disable it by setting semantic_search to false:
name: "test"
elasticsearch:
  semantic_search: false
When activated, the content field is indexed as usual but a new field named content_semantic
is created and uses the semantic_text
field type. This field type is used to store the semantic information extracted from the content by using the defined
inference API (defaults to Elser model).
You can change the model to use by changing the component template. For example, a recommended model when you have only english content is the Elastic multilingual-e5-small:
 PUT _component_template/fscrawler_fscrawler_mapping_content_semantic
 {
   "template": {
     "mappings": {
       "properties": {
         "content": {
           "type": "text",
           "copy_to": "content_semantic"
         },
         "content_semantic": {
           "type": "semantic_text",
           "inference_id": ".multilingual-e5-small-elasticsearch"
         }
       }
     }
   }
 }
Bulk settings
FSCrawler is using bulks to send data to elasticsearch. By default the
bulk is executed every 100 operations or every 5 seconds or every 10 megabytes. You can change
default settings using bulk_size, byte_size and flush_interval:
name: "test"
elasticsearch:
  bulk_size: 1000
  byte_size: "500kb"
  flush_interval: "2s"
Whole _bulk HTTP calls are retried on 429 (Too Many Requests) and 5xx responses, using the
same backoff policy as search requests. If retries are exhausted, the failure is logged and the
crawl run is marked as ERROR in the checkpoint (documents are not silently dropped).
Added in version 3.0.
You can also choose the Elasticsearch bulk write operation with bulk_operation:
index(default) — create or replace the document for a given_idcreate— create the document only if the_iddoes not already exist (first writer wins). Expected “document already exists” conflicts are ignored and do not flood the logs.
name: "test"
elasticsearch:
  bulk_operation: "create"
This is especially useful with content-based document ids (see
Deduplicate documents with a content-based _id): identical files share one _id, and
create keeps the first indexed copy instead of overwriting it.
Note
bulk_operation applies to document writes sent through the bulk processor, including
folder documents when fs.index_folders is enabled. Folder ids are path-based
and unique, so create only skips a folder document that already exists.
Tip
Elasticsearch has a default limit of 100mb per HTTP request as per
elasticsearch HTTP Module
documentation.
Which means that if you are indexing a massive bulk of documents, you
might hit that limit and FSCrawler will throw an error like
entity content is too long [xxx] for the configured buffer limit [104857600].
You can either change this limit on elasticsearch side by setting
http.max_content_length to a higher value but please be aware that
this will consume much more memory on elasticsearch side.
Or you can decrease the bulk_size or byte_size setting to a smaller value.
Using Ingest Node Pipeline
You can use an Ingest Node pipeline to transform documents sent by FSCrawler before they are actually indexed.
For example, if you have the following pipeline:
PUT _ingest/pipeline/fscrawler
{
  "description" : "fscrawler pipeline",
  "processors" : [
    {
      "set" : {
        "field": "foo",
        "value": "bar"
      }
    }
 ]
}
In FSCrawler settings, set the elasticsearch.pipeline option:
name: "test"
elasticsearch:
  pipeline: "fscrawler"
Note
Folder objects are not sent through the pipeline as they are more internal objects.
Node settings
FSCrawler is using elasticsearch REST layer to send data to your
running cluster. By default, it connects to https://127.0.0.1:9200
which is the default when running a local node on your machine.
Note that using https requires SSL Configuration set up.
For more information, read SSL Configuration.
FSCrawler supports all kind of Elasticsearch deployments:
Of course, in production, you would probably change this and connect to a production cluster:
name: "test"
elasticsearch:
  urls:
  - "https://mynode1.mycompany.com:9200"
You can define multiple nodes:
name: "test"
elasticsearch:
  urls:
  - "https://mynode1.mycompany.com:9200"
  - "https://mynode2.mycompany.com:9200"
  - "https://mynode3.mycompany.com:9200"
Note
If you are using Elastic Cloud, you can just use the Elasticsearch Endpoint.
Note
If you are using Start Local:
curl -fsSL https://elastic.co/start-local | sh
The url to use is http://localhost:9200 and the API key to use is available in the .env generated file.
Path prefix
If your elasticsearch is running behind a proxy with url rewriting,
you might have to specify a path prefix. This can be done with path_prefix setting:
name: "test"
elasticsearch:
  urls:
  - "http://mynode1.mycompany.com:9200"
  path_prefix: "/path/to/elasticsearch"
Note
The same path_prefix applies to all nodes.
Using Credentials (Security)
If you have a secured cluster, you can use several methods to connect to it:
Basic Authentication (not recommended / deprecated)
API Key
Added in version 3.0.
Let’s create an API Key named fscrawler:
 POST /_security/api_key
 {
   "name": "fscrawler"
 }
This gives something like:
 {
   "id": "VuaCfGcBCdbkQm-e5aOx",
   "name": "fscrawler",
   "expiration": 1544068612110,
   "api_key": "ui2lp2axTNmsyakw9tvNnw",
   "encoded": "VnVhQ2ZHY0JDZGJrUW0tZTVhT3g6dWkybHAyYXhUTm1zeWFrdzl0dk5udw=="
 }
Then you can use the encoded API Key in FSCrawler settings:
name: "test"
elasticsearch:
  api_key: "VnVhQ2ZHY0JDZGJrUW0tZTVhT3g6dWkybHAyYXhUTm1zeWFrdzl0dk5udw=="
Basic Authentication (deprecated)
The best practice is to use API Key. But if you have no other choice, you can still use Basic Authentication.
You can provide the username and password to FSCrawler:
name: "test"
elasticsearch:
  username: "elastic"
  password: "changeme"
Warning
The Elasticsearch password is stored in plain text when you add it to the job settings file. To keep credentials out of that file, provide both values as environment variables:
FSCRAWLER_ELASTICSEARCH_USERNAME=elastic \
FSCRAWLER_ELASTICSEARCH_PASSWORD=changeme \
bin/fscrawler test
You can also provide them as Java system properties:
FS_JAVA_OPTS="-Delasticsearch.username=elastic -Delasticsearch.password=changeme" \
bin/fscrawler test
The --username option and interactive password prompt are no longer supported. Settings in the
job file take precedence over environment variables and Java system properties.
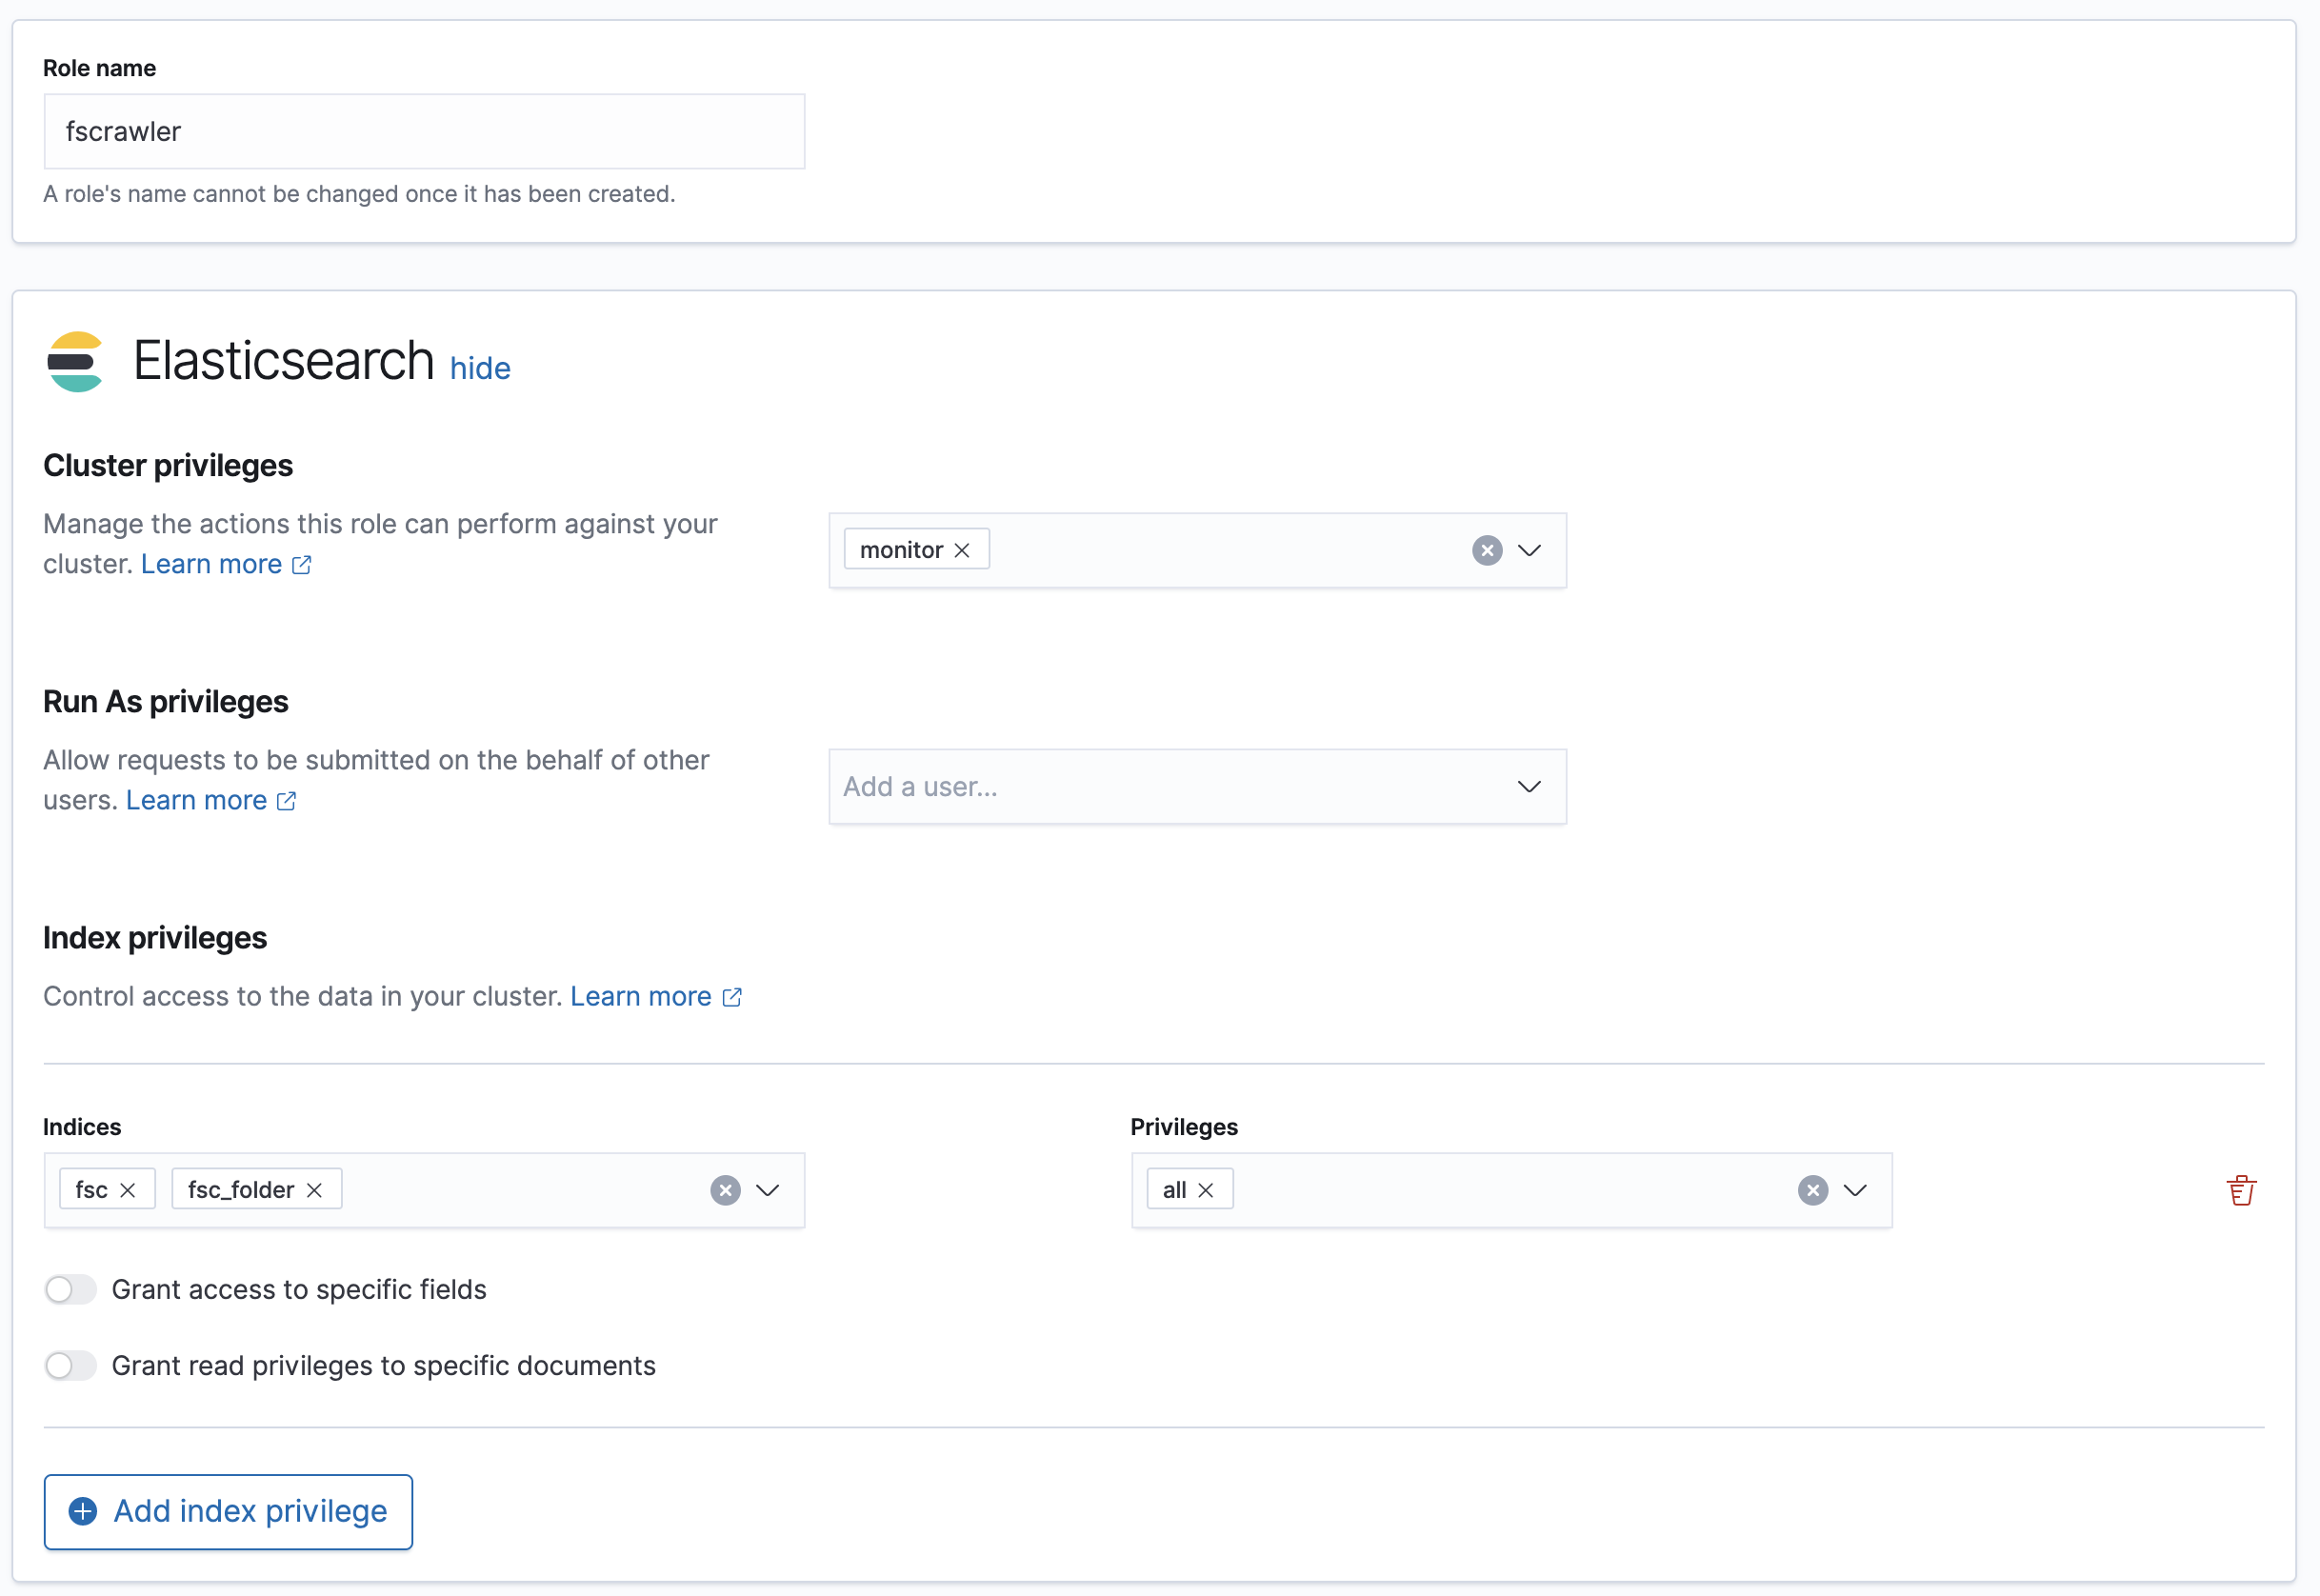
User permissions
If you want to use another user than the default elastic (which is admin), you will need to give him some permissions:
cluster:monitorindices:fsc/allindices:fsc_folder/all
where fsc is the FSCrawler index name as defined in Index settings for documents.
This can be done by defining the following role:
 PUT /_security/role/fscrawler
 {
   "cluster" : [ "monitor" ],
   "indices" : [ {
       "names" : [ "fsc", "fsc_folder" ],
       "privileges" : [ "all" ]
   } ]
 }
This also can be done using the Kibana Stack Management Interface.
Then, you can assign this role to the user who will be defined within the username setting.
SSL Configuration
In order to ingest documents to Elasticsearch over HTTPS based connection, you obviously need to set the URL
to https://your-server-address. If your server is using a certificate that has been signed
by a Certificate Authority, then you’re good to go. For example, that’s the case if you are running Elasticsearch
from cloud.elastic.co.
But if you are using a self signed certificate, which is the case in development mode, you need to either ignore the ssl check (not recommended) or provide the certificate to the Elasticsearch client.
To bypass the SSL Certificate verification, you can use the ssl_verification option:
name: "test"
elasticsearch:
  api_key: "VnVhQ2ZHY0JDZGJrUW0tZTVhT3g6dWkybHAyYXhUTm1zeWFrdzl0dk5udw=="
  ssl_verification: false
If you are running Elasticsearch from a Docker container, you can copy the self-signed certificate
generated in /usr/share/elasticsearch/config/certs/http_ca.crt to your local machine:
docker cp CONTAINER_NAME:/usr/share/elasticsearch/config/certs/http_ca.crt /path/to/certificate
And then, you can specify this file in the elasticsearch.ca_certificate option:
name: "test"
elasticsearch:
  api_key: "VnVhQ2ZHY0JDZGJrUW0tZTVhT3g6dWkybHAyYXhUTm1zeWFrdzl0dk5udw=="
  ca_certificate: /path/to/certificate/http_ca.crt
Note
You can also import your certificate into <JAVA_HOME>\lib\security\cacerts.
For example, if you have a root CA chain certificate or Elasticsearch server certificate
in DER format (it’s a binary format using a .cer extension), you need to:
Logon to server (or client machine) where FSCrawler is running
Run:
keytool -import -alias <alias name> -keystore "<JAVA_HOME>\lib\security\cacerts" -file <Path of Elasticsearch Server certificate or Root certificate>
It will prompt you for the password. Enter the certificate password like changeit.
Make changes to the FSCrawler
_settings.yamlfile to connect to your Elasticsearch server over HTTPS:
name: "test"
elasticsearch:
 api_key: "VnVhQ2ZHY0JDZGJrUW0tZTVhT3g6dWkybHAyYXhUTm1zeWFrdzl0dk5udw=="
 urls:
 - "https://localhost:9243"
Tip
If you can not find keytool, it probably means that you did not add your JAVA_HOME/bin directory to your path.
Generated fields
FSCrawler may create the following fields depending on configuration and available data. The table below lists the main fields; see the JSON example in the next section for a concrete document shape.
Field |
Description |
|---|---|
|
Extracted text content |
|
Semantic-text copy of the content (when semantic search is enabled) |
|
BASE64-encoded binary file (when |
|
Document metadata extracted by Tika (author, title, date, language, etc.) |
|
File attributes (filename, extension, size, dates, checksum, etc.) |
|
Virtual, real, and root path information |
|
Filesystem attributes (owner, group, permissions) |
|
Additional tags provided via external metadata |
For more information about meta data, please read the TikaCoreProperties .
Here is a typical JSON document generated by the crawler:
 {
    "content":"This is a sample text available in page 1\n\nThis second part of the text is in Page 2\n\n",
    "content_semantic":"This is a sample text available in page 1\n\nThis second part of the text is in Page 2\n\n",
    "file":{
       "content_type":"application/vnd.oasis.opendocument.text",
       "created":"2018-07-30T11:35:08.000+0000",
       "extension":"odt",
       "filename":"test.odt",
       "filesize":6236,
       "indexing_date":"2018-07-30T11:35:19.781+0000",
       "last_accessed":"2018-07-30T11:35:08.000+0000",
       "last_modified":"2018-07-30T11:35:08.000+0000",
       "url":"file:///tmp/test.odt"
    },
    "meta":{
       "author":"David Pilato",
       "created":"2016-07-07T16:37:00.000+0000",
       "date":"2016-07-07T16:37:00.000+0000",
       "description":"Comments",
       "keywords":[
          "keyword1",
          "  keyword2"
       ],
       "language":"en",
       "title":"Test Tika title"
    },
    "path":{
       "real":"/tmp/test.odt",
       "root":"7537e4fb47e553f110a1ec312c2537c0",
       "virtual":"/test.odt"
    }
 }
Search examples
You can use the content field to perform full-text search on
GET docs/_search
{
 "query" : {
   "match" : {
       "content" : "the quick brown fox"
   }
 }
}
To perform semantic search, you can use the content_semantic field:
GET docs/_search
{
 "query" : {
   "semantic" : {
       "content_semantic" : "a very fast animal"
   }
 }
}
You can use meta fields to perform search on.
   GET docs/_search
   {
     "query" : {
       "term" : {
           "file.filename" : "mydocument.pdf"
       }
     }
   }
Or run some aggregations on top of them, like:
GET docs/_search
{
 "size": 0,
 "aggs": {
   "by_extension": {
     "terms": {
       "field": "file.extension"
     }
   }
 }
}